05. Understanding the GUI
Understanding the GUI
Understanding the GUI
The Gazebo GUI is divided into four major sections:
- Scene
- Side Panel
- Toolbars
- Menu
Scene
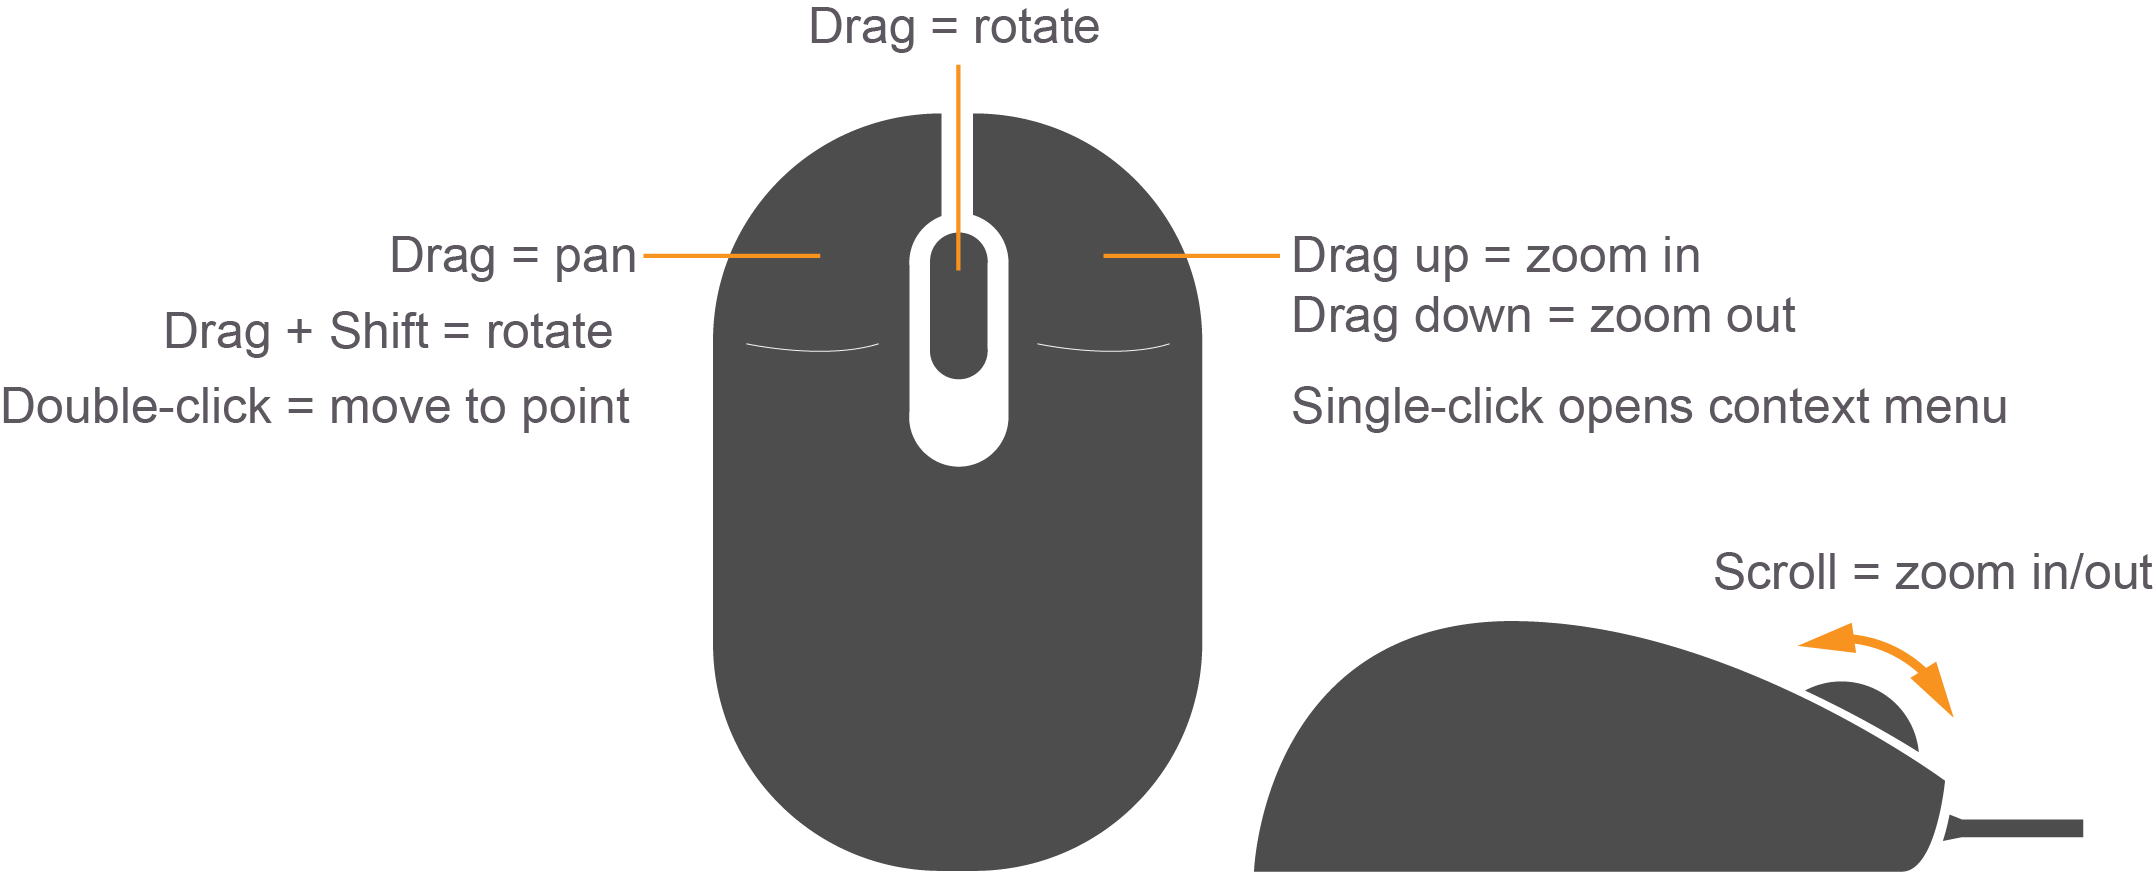
The scene is where you will be spending most of your time, whether creating a simulation or running one. While you can use a trackpad to navigate inside the scene, a mouse is highly recommended.
You can pan the scene by pressing the left mouse button and dragging. If you hold down SHIFT in addition, you can now rotate the view. You can zoom in and out by using the mouse scroll or pressing and dragging the RMB.
Side Panel
The side panel on the left consists of three tabs:
- World
- Insert
- Layers
World
This tab displays the lights and models currently in the scene. By clicking on individual model, you can view or edit its basic parameters like position and orientation. In addition, you can also change the physics of the scene like gravity and magnetic field via the Physics option. The GUI option provides access to the default camera view angle and pose.
Insert
This is where you will find objects (models) to add to the simulation scene. Left click to expand or collapse a list of models. To place an object in the scene, simply left-click the object of interest under the Insert tab; this will bind the object to your mouse cursor, and now you can place it anywhere in the scene by left-clicking at that location.
Layers
This is an optional feature, so this tab will be empty in most cases. To learn more about Layers, click here .
Top Toolbar
Next, we have a toolbar at the top. It provides quick access to some cursor types, geometric shapes, and views.
Select mode
Select mode is the most commonly used cursor mode. It allows you to navigate the scene.
Translate mode
One way to change an object's position is to select the object in the world tab on the side panel and then change its pose via properties. This is cumbersome and also unnatural, the translate mode cursor allows you to change the position of any model in the scene. Simply select the cursor mode and then use the proper axis to drag the object to its desired location.
Rotate mode
Similar to translate mode, this cursor mode allows you to change the orientation of any given model.
Scale mode
Scale mode allows you to change the scale, and hence, overall size of any model.
Undo/Redo
Since we humans are best at making mistakes, the undo tool helps us revert our mistakes. On the other hand if you undid something that you did not intend to, the redo tool can come to the rescue.
Simple shapes
You can insert basic 3D models like cubes, spheres, or cylinders into the scene.
Lights
Add different light sources like a spotlight, point light, or directional light to the scene.
Copy/Paste
These tools let you copy/paste models in the scene. On the other hand, you can simply press Ctrl+C to copy and Ctrl+V to paste any model.
Align
This tool allows you to align one model with another along one of the three principal axes.
Change view
The change view tool lets you view the scene from different perspectives like top view, side view, front view, bottom view.
Bottom Toolbar
The Bottom Toolbar has a neat play and pause button. This button allows you to pause the simulation and conveniently move objects around. This toolbar also displays data about the simulation, such as the simulation time, the real time, and the relationship between the two. There is also an frames-per-second counter that can be found to gauge your system's performance for any given scene.
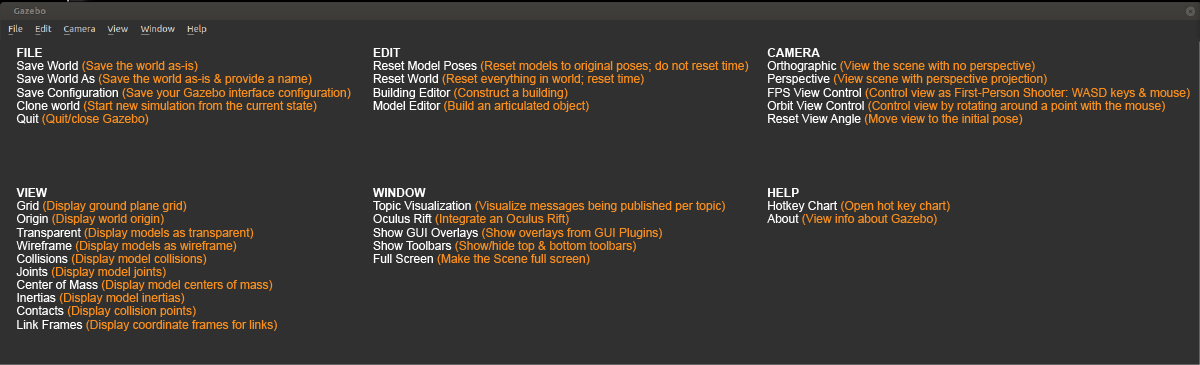
Menu
The Menu: Some of the menu options are duplicated in the Toolbars or as right-click context menu options in the Scene. If you click on Edit, you can switch to the Building Editor to design building or the Model Editor to build models. We will be working in both of these features in the upcoming concepts.